Protein Ice Cream: 265 Calories and 40g of Protein per Full Pint
Homemade protein ice cream: 265 calories, 40g protein, zero guilt. Creamy chocolate-peanut butter dessert that's actually good for you. Learn both recipes.
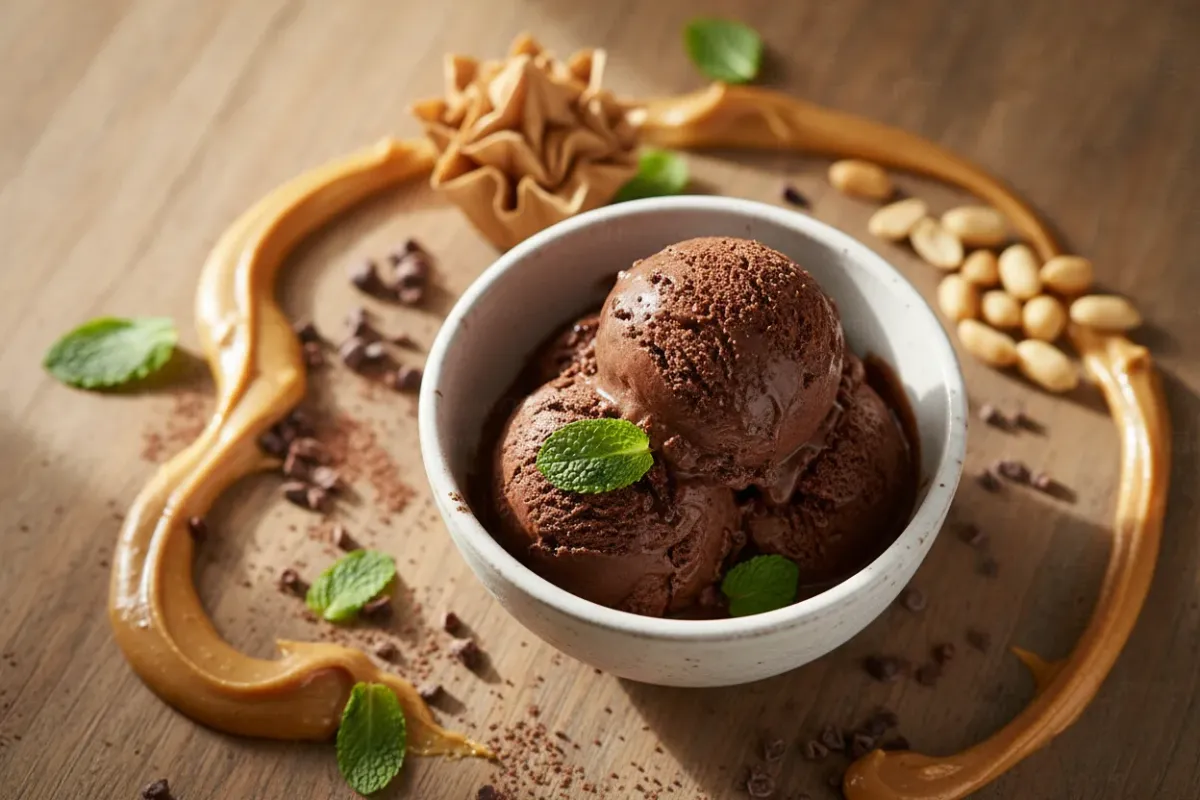
A full pint of ice cream — chocolate, with peanut butter, thick and creamy — for just 265 calories. And not some "diet ice with a hint of disappointment," but real, dense ice cream with 40 grams of protein. Sounds like fiction? In reality, this is something you can replicate at home two ways: with a Ninja Creami or without any special equipment at all.
This recipe is a godsend for anyone who tracks macros, watches their calories, but isn't ready to give up desserts. We'll break down both methods, talk about the ingredients, and discuss why protein ice cream isn't a compromise — it's a full-fledged dessert.
Why Protein Ice Cream Is Serious Business
Protein ice cream isn't just a trendy social media fad. Behind it is a simple and logical idea: replace the sugar and fat that form the base of regular ice cream with protein-rich ingredients — and get a dessert that works for your body, not against it.
Protein That Satisfies
40 grams of protein in a single serving — that's roughly the same amount found in 200 grams of chicken breast. Only instead of boiled chicken — chocolate ice cream with peanut butter. Protein provides lasting satiety, supports muscle mass, and aids recovery after workouts. A pint like this can fully replace a post-gym protein shake.
Calories That Don't Scare You
For comparison: a standard pint (473 ml) of classic chocolate ice cream from the store contains an average of 800–1200 calories. The protein version — 265 kcal. This means you can eat the entire pint without guilt and without blowing your daily calorie budget. Even on a calorie deficit, this dessert fits easily into your diet.
Simplicity of Preparation
As the authors at MattsFitChef note, protein ice cream can be made with literally "three ingredients and a blender" — no ice cream maker and no Ninja Creami needed. And if you do have the special appliance — the process becomes even simpler, and the texture even creamier.
What Is the Ninja Creami and Why Do You Need It
The Ninja Creami is a compact kitchen gadget that transforms a fully frozen mass into creamy ice cream, sorbet, or smoothie bowls. Unlike a traditional ice cream maker, which freezes and churns simultaneously, the Ninja Creami works on the reverse principle: first the mixture freezes in a special container (pint), and then the appliance grinds it with a powerful blade, breaking ice crystals down to a smooth texture.
It's precisely this mechanism that makes the Ninja Creami an ideal tool for protein ice cream. Protein mixtures freeze denser than regular ice cream bases (they're low in fat and sugar — the two components that prevent large crystals from forming in traditional recipes). The Ninja Creami handles this challenge, turning even a dense frozen block into something that truly resembles ice cream.
According to recommendations from Live Simply, for achieving the ideal texture you should use the "light ice cream" mode, then add a bit of milk and run the "respin" mode. This gives the creamiest result.
Ingredients for Chocolate Peanut Butter Protein Ice Cream
Before moving on to the preparation methods, let's break down the basic set of ingredients. These components work for both methods — with and without the Ninja Creami.
The Base
- 2% milk — 240 ml. It creates the liquid base that provides creaminess. You can use skim milk for even further calorie reduction, but 2% gives the best balance of texture and flavor.
- Non-fat Greek yogurt — 50 g. Greek yogurt is the secret weapon of protein ice cream. It adds protein, thickness, and a slight tanginess that balances the sweetness.
- Chocolate protein powder (whey) — 1 scoop (about 30 g). This is both the protein source and the foundation of the chocolate flavor. Whey protein gives the best texture compared to plant-based alternatives — as noted by the authors at MattsFitChef.
- Peanut butter (PB2 or regular) — 1 tablespoon. PB2 (powdered peanut butter) is an excellent option for reducing fat and calories. Regular peanut butter will add more richness and flavor, but the calories will be slightly higher.
Sweetener and Texture
- Zero-calorie sweetener — to taste. Erythritol, stevia, monk fruit, or allulose. Allulose is a particular favorite among those who make protein ice cream: it lowers the freezing point, making the ice cream softer when served.
- Xanthan gum — 1/4 teaspoon (optional). It helps thicken the mixture and prevent ice crystal formation. Especially important for the no-Ninja Creami method.
- Pinch of salt — enhances the chocolate and peanut flavor.
- Cocoa powder — 1 teaspoon (optional, for a more intense chocolate flavor).
Approximate Macros for the Entire Pint
| Metric | Value |
|---|---|
| Calories | ~265 kcal |
| Protein | ~40 g |
| Fat | ~5 g |
| Carbs | ~15 g |
Exact values depend on the specific brands of ingredients used. If you use PB2 instead of regular peanut butter and skim milk — the calorie count can be even lower.
Method 1: With Ninja Creami
This method gives the best result in terms of texture — the ice cream comes out maximally creamy and closest to store-bought.
Step 1: Preparing the Base
Mix all ingredients in a blender or shaker until completely smooth. Important: the protein powder must be fully dissolved, with no lumps. If you have time — chill the mixture in the refrigerator for 20–30 minutes before freezing. As the authors at IceCreamIn note, chilling the base mixture before pouring it into the Ninja Creami pint gives a significantly better texture.
Step 2: Freezing
Pour the mixture into the Ninja Creami pint. Close the lid and place in the freezer for a minimum of 24 hours. This is a critically important step — the mixture must be completely and evenly frozen. If you rush and take it out early — the ice cream won't turn out right.
According to recommendations from Live Simply, the base prep time is only 5 minutes, but freezing requires a full day. This is one of those cases where patience is rewarded.
Step 3: Processing in the Ninja Creami
Remove the pint from the freezer and install it in the appliance. Run the "Light Ice Cream" mode (it's designed specifically for low-fat mixtures). Wait for the cycle to complete.
Step 4: Respin
After the first cycle, the ice cream may still be too dense or uneven — and that's normal. Add 20 g of milk directly into the pint and run the "Re-spin" mode. This additional pass breaks up remaining crystals and makes the texture perfectly smooth. If needed, you can do a second respin.
Step 5: Serving
The ice cream is ready to eat immediately after processing. You can top it with crushed peanuts, cacao nibs, or add a few sugar-free chocolate chips.
Method 2: Without Ninja Creami (No-Creami Method)
Not everyone has a Ninja Creami — and that's absolutely no reason to give up on protein ice cream. There are several ways to achieve an excellent result without special equipment. As the specialists at Mixed Kreations confirm, ice cream can be made without an ice cream maker or Ninja Creami using the no-churn method — all you need are simple ingredients and a freezer.
Method A: Blender + Freezer (Recommended)
This is the simplest and most effective method without special equipment.
Preparation:
- Blend all ingredients in a powerful blender until completely smooth — the texture should be like a thick milkshake.
- Pour into a container with a lid (preferably wide and shallow — this way the mass will freeze more evenly).
- Place in the freezer for 1 hour.
- Remove, stir with a fork or whisk, breaking up the ice crystals that are beginning to form.
- Repeat stirring every 30–45 minutes 2–3 more times.
- After the final stir, leave in the freezer for another 1–2 hours until desired consistency.
Total time: about 4–5 hours, of which active work is about 10 minutes.
Texture hack: Add 1/4 teaspoon of xanthan gum to the mixture — it works as a stabilizer and helps mimic the creaminess that the Ninja Creami achieves through mechanical processing. Also, 1 tablespoon of vodka (it won't freeze and will make the ice cream softer when served) — but this is, of course, an optional trick that will slightly add to the calories.
Method B: Frozen Bananas + Blender
If you want something even simpler — you can use a frozen banana as the base. The authors at MattsFitChef offer a protein ice cream recipe with just three ingredients: frozen bananas, Greek yogurt, and protein powder. Everything goes into the blender and is processed to a soft serve consistency.
This version is ready immediately — no need to wait hours. But there's a caveat: bananas add natural sugars and carbs, so the calories and macros will differ from the original recipe. A pint of this ice cream will be closer to 350–400 kcal rather than 265.
Method C: Bag with Ice and Salt
This is more of a fun experiment than an everyday method, but it works and requires absolutely no equipment. As described by the authors at The Ice Maker Hub, you need to place the mixture in a small zip-lock bag, and then place that bag inside a larger bag with four cups of crushed ice and four tablespoons of coarse salt. Shake vigorously for 5–8 minutes. The salt lowers the melting point of the ice, and the mixture freezes right in the bag.
The result will be less creamy than when using a blender or Ninja Creami, but the process itself is great fun, especially when making it with kids.
Secrets to the Perfect Texture
Protein ice cream isn't simply "mix and freeze." There are nuances that separate an icy rock from a creamy dessert.
Choosing the Right Protein Powder
Not all protein powders are equally good for ice cream. Whey protein is the best choice: it gives the smoothest, creamiest texture. Casein protein also works well and makes the ice cream thicker and stretchier. Plant-based proteins (pea, rice) can produce graininess — if you use them, add more liquid and definitely include xanthan gum.
Chocolate flavors typically mask any protein aftertaste best of all. Vanilla is the second most versatile option.
The Role of Fat and Sugar (and Their Substitutes)
In regular ice cream, fat (from cream) and sugar serve an important function: they prevent the formation of large ice crystals. As experts at Serious Eats explain, the science of ice crystal formation is key to understanding how ice cream works. In protein ice cream there's little fat and sugar, so substitutes are needed:
- Xanthan gum — binds water and prevents crystallization.
- Allulose — a low-calorie sugar that behaves like regular sugar during freezing but contains minimal calories.
- Greek yogurt — adds both fat content and protein simultaneously.
- Fairlife milk (or any ultra-filtered milk with elevated protein content) — as the authors at IceCreamIn note, it significantly increases protein content while simultaneously reducing carbs.
Proper Freezing
Freezer temperature matters. Ideal is minus 18°C (the standard setting for most freezers). A freezer that's too cold will make the ice cream rock-hard. Before serving, ice cream made without a Ninja Creami should be taken out of the freezer 5–10 minutes ahead of time so it slightly thaws and becomes pliable.
Recipe Variations
The base recipe is easily adaptable to different flavors while maintaining approximately the same calorie count and protein content.
Mocha Protein
Replace part of the milk with strong cold coffee (50 ml). Coffee enhances the chocolate flavor and adds depth. Calories remain virtually unchanged.
Vanilla Peanut
Use vanilla protein powder instead of chocolate, increase the peanut butter to 1.5 tablespoons. Top with crushed peanuts.
Strawberry Cheesecake
Vanilla protein + 50 g frozen strawberries + 30 g cream cheese (low-fat). This creates a berry-cream version with a slight tang.
Mint Chocolate
Chocolate protein + 1/4 teaspoon mint extract + a handful of sugar-free chocolate chips (add after processing). A classic that never gets old.
Cottage Cheese — An Unexpected Ingredient
Cottage cheese deserves a special mention as an ingredient in protein ice cream. The authors at IceCreamIn describe a cottage cheese-based protein ice cream recipe that turns out "truly rich in flavor while containing an impressive amount of protein." Cottage cheese works excellently as a replacement for or supplement to Greek yogurt — it adds creaminess and even more protein.
If you use smooth cottage cheese (not chunky) or blend chunky cottage cheese until completely smooth, the ice cream texture won't suffer. Low-fat cottage cheese (0–2% fat) is an excellent option for this recipe.
When to Eat Protein Ice Cream
Protein ice cream isn't just a dessert for "when you're craving something sweet." Thanks to its high protein content and low calorie count, it fits into several scenarios:
- After a workout — as a replacement for a protein shake. 40 g of protein is enough to kick-start muscle recovery, and the carbs from milk will help replenish glycogen.
- Evening dessert — when you want something sweet before bed but don't want to go overboard on calories. 265 kcal is less than a single standard candy bar from the store.
- Snack on a hot day — protein ice cream perfectly satisfies both hunger and thirst simultaneously.
- Meal prep for the week — you can prepare 3–4 pints on the weekend, freeze them, and pull one out each evening.
Method Comparison: Ninja Creami vs. No Ice Cream Maker
| Parameter | Ninja Creami | Blender + Freezer |
|---|---|---|
| Prep time | 5 minutes + 24 hours freezing | 10 minutes + 4–5 hours freezing |
| Texture | Maximally creamy, like store-bought ice cream | Good, but slightly more icy |
| Equipment | Ninja Creami (~$200) | Any blender |
| Difficulty | Very easy | Easy, but requires stirring every 30–45 minutes |
| Respin | Yes, texture can be improved with a repeat cycle | No equivalent — can re-blend in blender |
| Portion | Fixed pint | Any volume |
Both methods give excellent results. The Ninja Creami wins on texture and convenience, but the method without it is absolutely viable and requires no additional investment.
Common Mistakes and How to Avoid Them
"The ice cream turned rock-hard"
The most common problem. The cause — not enough fat and sugar in the mixture, which are responsible for softness. Solution: add allulose (it prevents the ice cream from freezing too solidly) or 1/4 teaspoon of xanthan gum.
"Protein aftertaste"
Some protein powders have a pronounced artificial aftertaste that intensifies when frozen. Solution: use high-quality protein, add a pinch of salt (it masks unwanted flavors) and cocoa powder.
"Grainy texture"
Often occurs when using plant-based protein or when mixing is insufficient. Solution: use whey protein, mix in a powerful blender (not a shaker), blend for a minimum of 60 seconds.
"The ice cream separated after freezing"
This happens if the base wasn't uniform enough or if there's too much water in the mixture. Solution: add xanthan gum, increase the proportion of Greek yogurt.
Frequently Asked Questions
How long do you need to freeze the mixture before using it in the Ninja Creami?
A minimum of 24 hours. The mixture must be completely and evenly frozen. If you take it out earlier — the appliance won't be able to properly process the mass, and the texture will be uneven. As stated in the recommendations from Live Simply, freezing time is one full day.
Can you make this ice cream without a Ninja Creami?
Yes, absolutely. The blender method with periodic stirring in the freezer gives a good result. You can also use a food processor or even a regular mixer. As confirmed by the authors at Mixed Kreations, for the no-churn method you only need simple ingredients and a freezer.
Which protein powder works best for this recipe?
Whey protein gives the best texture — creamy and smooth. This is confirmed by the specialists at MattsFitChef, who recommend whey protein specifically for optimal results. Casein protein is also good — it makes the ice cream thicker and stretchier.
Can you reprocess the ice cream if it's not smooth after the first cycle?
Yes, the respin function in the Ninja Creami is designed exactly for this. Simply add a bit of milk (about 20 g) and run the reprocessing mode. If needed, you can do two or three repeat cycles until the texture is perfect.
Does adding collagen improve ice cream texture?
Collagen powder can make ice cream texture smoother and stretchier, since it works as a natural thickener. However, collagen doesn't provide as pronounced a thickening effect as casein or xanthan gum. It can be added in addition to the main protein to increase overall protein content.
Protein ice cream is one of those cases where healthy eating and pleasure don't contradict each other. 265 calories, 40 grams of protein, chocolate with peanut butter — and all of this in one big pint that you can eat without a single pang of guilt. Give it a try — and regular store-bought ice cream will just seem boring.
This article is for informational purposes only and is not medical advice. Consult a doctor or dietitian before making dietary changes.