Croissants at Home: From Fear to Perfect Layers
Master homemade croissants with our guide. Learn the secrets to golden, flaky layers—even beginners succeed. Your bakery-quality breakthrough starts today.
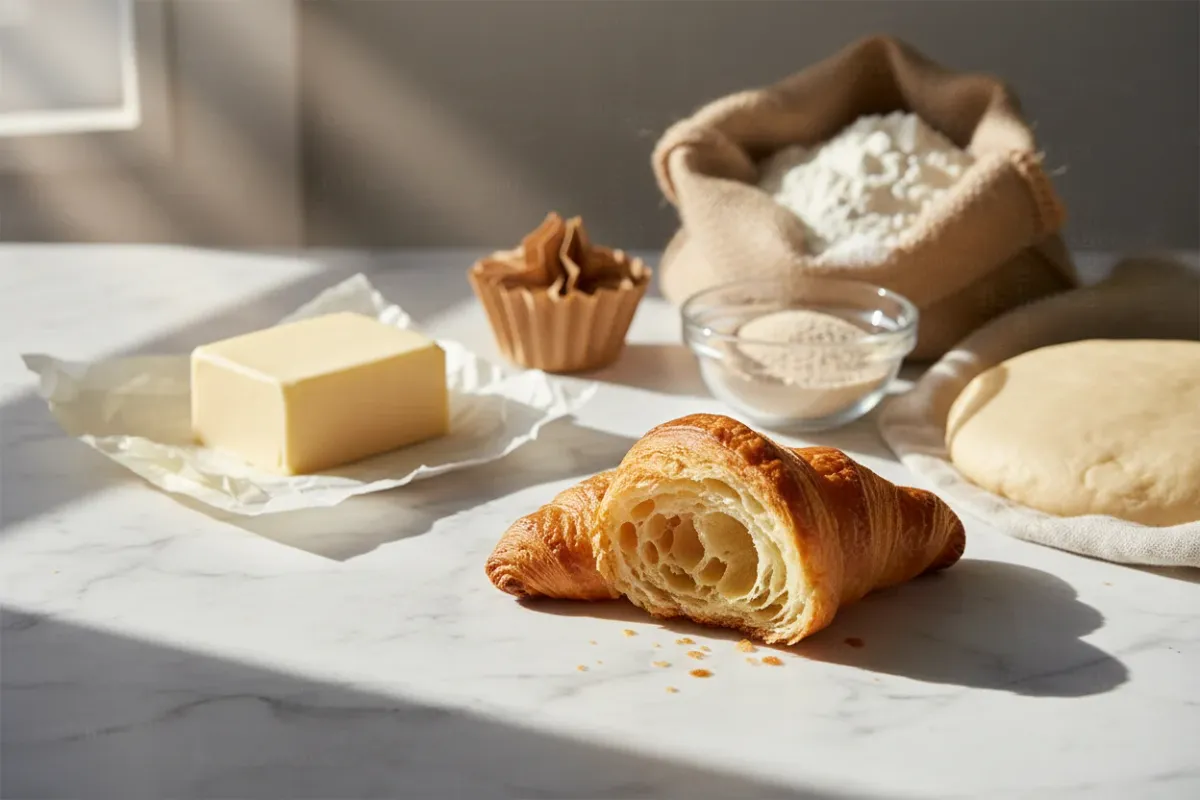
Croissants are one of those things that seem absolutely unattainable in a home kitchen. As if only "mystical French elves" could make them, as a student at the Institute of Culinary Education (ICE) once admitted, before she baked her first batch herself and exclaimed: "I'm not a mystical French elf — and I did it!" That excitement is familiar to anyone who has ever pulled golden, flaky, incredibly aromatic homemade croissants out of the oven.
But let's be honest: croissants are not a quick weeknight recipe. They're a project, a little culinary adventure that requires time, patience, and cold butter. But the reward is an incomparable feeling when you break through the crispy crust and see dozens of paper-thin layers inside. And yes, it's entirely possible to do this at home on your first try, if you know a few key rules.
Why Croissants Aren't as Scary as They Seem
A blogger and cook from Love and Olive Oil shared her experience making croissants for the first time and was surprised by their "striking simplicity of the process." Yes, the process is long — the dough needs to be rolled out, folded, and chilled multiple times. But each individual step is fairly straightforward and repeatable.
At the same time, experts at Weekend Bakery honestly warn: "Most people need to make croissants 3–4 times to truly get a feel for the process." That's normal. Your first batch might not be perfect in shape — but it will almost certainly be delicious. And with each subsequent attempt, your hands memorize the motions, and the results keep getting better.
The main thing to understand: croissants are not about complex ingredients. Flour, butter, yeast, milk, sugar, salt. The magic here isn't in the ingredients — it's in the technique: lamination, meaning the creation of numerous alternating layers of dough and butter.
What Is Lamination and Why Is It Necessary
Laminated dough is the foundation of croissants, Danish pastries, and puff pastry. As the Institute of Culinary Education (ICE) explains, when a pastry chef says "laminated," they mean dough that has "layer upon layer of butter" folded into it. During baking, the water in the butter turns to steam, pushing the dough layers apart and creating that airy, crispy structure.
The process looks like this: first, a basic yeast dough (détrempe) is prepared, then a slab of cold butter is enclosed in it, after which the dough is rolled out and folded multiple times. Each fold doubles or triples the number of layers. After three "turns" (folds), the dough contains dozens of layers of butter and dough, which produce that famous texture during baking.
According to King Arthur Baking's recommendation, after the first and second folds, the dough should be chilled in the refrigerator for 45 minutes, and after the final fold — at least 2 hours, or better yet, overnight. This is critically important: the cold butter must remain as separate layers and not get absorbed into the dough.
Step-by-Step Plan: How to Bake Croissants at Home
Step 1. Making the Dough (Détrempe)
The base dough for croissants is a yeast dough, but with one important difference: the milk must be cold. As Sally's Baking Addiction emphasizes, "the dough must always be cold" during the early stages. This is necessary so that the butter doesn't start melting prematurely during lamination.
The dough is mixed until uniform — there's no need to knead it to smoothness like bread dough. After mixing, it goes into the refrigerator for at least an hour, preferably overnight. According to recommendations from Beyond Sweet and Savory, the initial proofing of the détrempe can take about 2 hours in a warm place until the dough doubles in size, after which it is chilled.
Step 2. Preparing the Butter Slab
Butter is the star of croissants. It needs to be shaped into an even rectangular slab about 1 cm thick. The simplest method is to place the butter between two sheets of parchment paper and roll it out with a rolling pin.
The temperature of the butter is critical. King Arthur Baking specialists specify the exact number: butter for lamination should be about 13°C (55°F) at the start of the process. It should be cold and slightly springy, but not rock-hard. As Sally's Baking Addiction warns, if the butter layer is too stiff, it will "crack and break apart under the dough" instead of rolling out evenly with it.
Another important point: the choice of butter. One of the most common mistakes, according to La Cuisine de Géraldine, is using the wrong butter. For croissants, it's best to use butter with a high fat content — 82% and above. Regular butter contains more water, which negatively affects the flakiness.
Step 3. Lamination — Creating the Layers
This is the most critical stage. The butter slab is placed on the rolled-out dough, the dough is wrapped around the butter, and then a series of rolling and folding begins.
There are two main types of folds:
Book fold: the dough is folded into four layers. The top and bottom edges are folded toward the center, then one half is folded onto the other — "like closing a book," as Beyond Sweet and Savory describes it. For this fold, the dough is rolled into a rectangle approximately 20×60 cm.
Letter fold: the dough is folded into three layers, like a business letter. The dough is rolled into a rectangle approximately 20×50 cm and folded in thirds.
When rolling, there's a golden rule: work gently, from the center toward the edges, always rolling away from yourself. La Cuisine de Géraldine recommends turning the dough a quarter turn with each pass of the rolling pin — this helps distribute the butter evenly. And the experts at Weekend Bakery emphasize: the dough should be "gently elongated," not pressed down upon.
Another non-obvious but critically important tip from King Arthur Baking: before each fold, be sure to brush off excess flour from the surface of the dough. Leftover flour "glues the layers together" when steam forms during baking, and instead of airy layers, you get a dense texture.
Between each turn — a mandatory rest in the refrigerator. If the dough resists rolling, King Arthur Baking advises letting it rest for 10 minutes so the gluten can relax.
Step 4. Shaping
After the final chilling, the dough is rolled out into a thin sheet — about 3 mm thick, according to the professional guide from Corman. It is then cut into long triangles — the classic size is about 9×28 cm.
Each triangle is carefully rolled from the wide base to the tip. As the ICE student described it: "After cutting the dough into neatly measured triangles, gently rolling them into that famous crescent shape is the happiest feeling."
The shaped croissants are placed on a baking sheet seam-side down and sent to proof.
Step 5. Proofing
Proofing is the stage where the yeast does its work and the croissants increase in size. According to professional recommendations from Corman, the optimal proofing temperature is 26 to 31°C for approximately 2 hours.
Chef Ryan Pinheiro, quoted by Tasting Table, recommends an alternative approach: after shaping, place the croissants in the refrigerator for at least 8 hours (overnight is most convenient). During this time, "the water and yeast in the dough need to fully dry out," otherwise the croissant may turn out dense and heavy.
Over-proofing is one of the serious mistakes. According to Tasting Table, it weakens the gluten, resulting in "dense, sunken, and poorly browned croissants."
Step 6. Baking
Before baking, croissants are brushed with egg yolk — this gives them a golden color and beautiful shine. La Cuisine de Géraldine recommends chilling the shaped croissants in the refrigerator for another 10–15 minutes right before putting them in the oven — this helps prevent butter from leaking out.
Baking time according to Corman's professional standards: 15–17 minutes in a convection oven or 18–20 minutes in a conventional oven. The temperature is usually 180–200°C, depending on the oven.
It's important to know: a small amount of butter leaking during baking is normal. As Sally's Baking Addiction reassures, "some butter leaking during baking is normal and expected." But if the croissants are literally swimming in puddles of butter — it means the butter slab was too cold and didn't distribute evenly.
Temperature Control — the Key to Everything
If you remember only one thing from this entire article, let it be temperature control. Croissants are a constant interplay between cold and warmth.
The dough must be cold when rolling so the butter stays in separate layers. The butter must be pliable but not soft. The kitchen shouldn't be hot — the author at Love and Olive Oil directly warns: "Don't even attempt it if your kitchen temperature is above 24°C (75°F)."
If during rolling the dough becomes soft or the butter starts showing through — immediately into the refrigerator for 15–20 minutes. La Cuisine de Géraldine allows using the freezer to speed things up: "about 10–15 minutes," but the dough must not freeze — it should remain "cold and slightly springy to the touch, but still pliable."
Excessive kneading and handling with warm hands is another enemy. Tasting Table explains that the heat from your hands destroys the butter layers, and instead of a flaky texture, you get something "dense and chewy" with a "bread-like crumb."
Nutrition Facts for Homemade Croissants
Since this is a healthy eating blog, we can't skip the topic of calories. A croissant is not a diet product, and pretending otherwise would be dishonest. But a mindful approach to eating isn't about restrictions — it's about understanding what you eat.
One classic croissant (about 60 g) contains on average:
| Metric | Value |
|---|---|
| Calories | 240–270 kcal |
| Protein | 5 g |
| Fat | 13–15 g |
| Carbohydrates | 26–28 g |
Most of the calories come from butter. And that's fine — fats are essential for the body, and natural butter in reasonable amounts is far healthier than many industrial alternatives.
How to Fit a Croissant into Your Diet
- For breakfast — one croissant with an egg and greens. You'll get a balanced meal of about 350–400 kcal with good protein content.
- As a dessert — a mini croissant (30 g, ~130 kcal) after a main meal will satisfy your sweet tooth without guilt.
- Meal prep option — bake a batch, freeze them, and thaw one at a time. It's easier to control portions this way than when fresh pastries are sitting out on the table.
A croissant is not a "forbidden" food. It's an honest, straightforward product made from natural ingredients. One homemade croissant with a known composition is always better than three "health bars" with incomprehensible labels.
Five Beginner Mistakes and How to Avoid Them
1. Warm Kitchen or Warm Hands
Butter melts — layers disappear. Work quickly, chill the dough between stages, and don't hold it in your hands longer than necessary.
2. Too Much Pressure When Rolling
The rolling pin should gently elongate the dough, not press down on it. La Cuisine de Géraldine emphasizes: "you need to be extremely careful — applying just enough pressure to gradually stretch the dough."
3. Skipping the Chilling Stage
Every rest period in the refrigerator isn't just a pause — it's a necessary technical step. The gluten relaxes, and the butter firms up again. Skipping this step is guaranteed to ruin the texture.
4. Forgetting Flour on the Surface
Dusting flour is needed when rolling, but before folding, it must be brushed off. Otherwise, it will absorb moisture and glue the layers together.
5. Over-proofing
More is not better. If croissants have proofed too long, the gluten will weaken, and instead of an airy pastry, you'll get a flat disc.
And most importantly — remember the advice from Weekend Bakery: "With croissants, there's no way to hide small mistakes in technique" and "several small mistakes add up." But that's not a reason to be afraid — it's a reason to be attentive and enjoy the process.
How to Make Croissants a Little Healthier
A fully "healthy" croissant is an oxymoron. But there are a few sensible modifications:
- Whole wheat flour — replace up to 30% of regular flour with whole wheat. The texture will be slightly denser, but you'll get more fiber. The author at Love and Olive Oil experimented with flour, mixing bread flour with all-purpose — the principle is the same.
- Reducing sugar — the classic recipe already uses relatively little sugar (according to Corman's formula — 240 g per 3.7 kg of dough), but you can reduce it by another 20–30% without noticeable loss of flavor.
- Portion size — instead of large croissants, cut smaller triangles. A mini croissant weighing 30 g is only ~130 kcal, but delivers the same pleasure.
- Filling — instead of chocolate or sweet cream, add a cottage cheese filling with vanilla. More protein, less sugar, just as delicious.
Two-Day Preparation Plan
Croissants fit perfectly into a two-day project format, which makes the process less intimidating. King Arthur Baking says it directly: the work can be split over two days — you'll just "have to get up a little earlier" to shape, proof, and bake the croissants in time for breakfast.
Day 1 (evening, 30–40 minutes of active work):
- Mix the dough, place in the refrigerator
- Shape the butter slab, place in the refrigerator
- Before bed: enclose the butter in the dough, complete the first turn, place in the refrigerator
Day 2 (morning, 40 minutes of active work + waiting):
- Complete the remaining turns (with chilling between them)
- Roll out, cut, and shape the croissants
- Proof for 1.5–2 hours
- Bake for 15–20 minutes
In total — less than an hour and a half of actual hands-on work, spread over two days. And the waiting only builds the anticipation.
Is It Worth It?
As commenter Marie aptly noted on Love and Olive Oil: "Isn't it funny that the ratio of preparation time to eating time is always the highest with such delightful treats?" Several hours of work — and in five minutes, all that's left of the croissants are crumbs and happy faces.
But it's not just about the result. The process itself — rolling out the dough, folding the layers, watching raw pieces transform into golden, incredibly aromatic croissants — is meditation. It's a way to slow down, make something with your hands, and feel: "I made this myself."
The ICE student described her first croissants as "buttery, flaky, and so, so satisfying." And she added: "I'm not a mystical French elf — and I did it!" Let that attitude be your inspiration. Croissants at home — it's real. And your first attempt may turn out much better than you think.
Frequently Asked Questions
Why does butter leak out of croissants during baking?
Most often this happens because the butter wasn't cold enough during shaping or the layers weren't evenly distributed. La Cuisine de Géraldine recommends chilling the shaped croissants in the refrigerator for 10–15 minutes right before baking. A small amount of leaking is normal, but puddles of butter on the baking sheet are a signal to reconsider your temperature management.
Why aren't my croissants rising properly?
There could be several reasons: over-proofing (weakened gluten can't hold the shape), under-proofing (the yeast didn't have time to work), or butter that was too warm during lamination, preventing layers from forming. Chef Ryan Pinheiro recommends a long rest for shaped croissants in the refrigerator — at least 8 hours — for optimal results.
Why do croissants tear or burst open in the oven?
According to Weekend Bakery, this happens due to an insufficient number of layers combined with under-proofing. When the dough resembles bread dough more than laminated dough, the rapid rise in the oven causes it to tear at weak points. The solution is more careful lamination and sufficient proofing.
What temperature and oven setting should I use?
Corman's professional guide recommends 15–17 minutes in a convection oven or 18–20 minutes in a conventional oven. The temperature should be about 190°C. Convection gives a more even result, but croissants turn out beautifully in a conventional oven too — they just need a bit more time.
Why do my croissants come out uneven or lean to one side?
This is usually the result of uneven rolling: the butter is distributed thicker on one side. La Cuisine de Géraldine advises turning the dough a quarter turn with each pass of the rolling pin — this helps achieve even thickness and a symmetrical result.
This article is for informational purposes only and is not medical advice. Consult a doctor or dietitian before making dietary changes.